Integral Water Tank Construction
My 28-foot Pearson Triton came equipped with one 23-gallon fiberglass water tank located under the forward v-berth. Since this was not adequate for extended cruising, I carried extra rigid and collapsible plastic water cans in every conceivable location and spent a lot of time and effort dragging them out to refill the main tank. Eventually the tank worked loose from its mounts and started to rub against the hull. When it began leaking in a place inaccessible to repair, I was forced to replace it.
Before starting, I considered my options. Even if I ripped apart the v-berth and pulled out the tank to repair it, I would still have only a 23-gallon tank. I ruled out replacing it with a prefabricated plastic tank or custom-built stainless steel tank because of the cost and because a tank of the shape and capacity I required would not fit through my companionway hatch. Not only could these tanks develop leaks that would be difficult to repair, they prevent access to the hull. If the hull were damaged behind a rigid tank there would be no way to stop the leak and the boat could sink. Flexible tanks were an option, but the size and shape I wanted was not available and at the time I had no experience or confidence in how they stand up to the possibility of chafe damage or leaking fittings. I later installed a Plastimo flexible tank on another boat but within a year it developed a leak so I stopped using them. Even a more rugged brand of flexible tank has no inspection port so cleaning them is a problem.
Since I had in mind to create sealed watertight bulkheads wherever possible, my solution was to build an integral tank into the boat incorporating the fiberglass hull and an existing bulkhead in the V-shaped bow area as the tank’s bottom and sides. By adding one more side and a top, I would have a tank of exactly the shape and capacity I wanted, without some of the problems of standard tanks. It did require careful design and (as I soon found out) a considerable amount of work.
There are several advantages of integral tanks over other types of tanks. Integral tanks are more space efficient and hold more water than any other type tank because they utilize all the available space of the tank compartment. They add massive strength to the hull. They act as a watertight locker in case of collision. They fit in areas of the hull where other tanks cannot. With an integral tank you can choose exactly the size tank you want and not be constrained to use whatever size tank is commercially available. Properly built integral tanks are much less likely than other tanks to leak or need replacement. If you get rolled they can’t break free and cause further damage or loss of precious drinking water. Whichever type water tanks you choose, it’s worth remembering that fresh water is your most important and most used resource and its storage deserves careful thought.
Building the Integral Tank
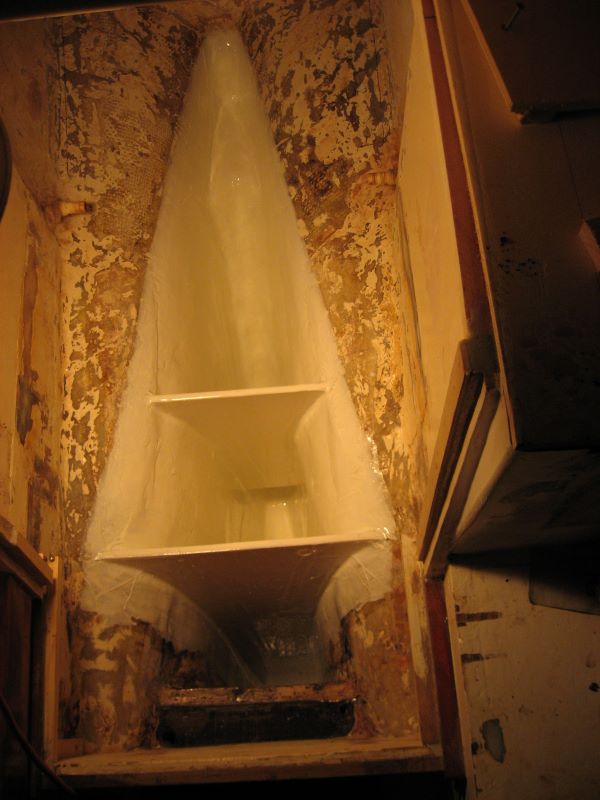
After emptying all lockers in the forward cabin, I used a jig saw to cut out the entire top plywood bunk surface to within 3-inches of where it was glassed to the hull, and set the pieces aside until later. I then removed and discarded the old tank and cleaned out the wet mass of filth that had collected in the gap between the tank and the hull. Now began the dirty work of grinding and laying up fiberglass that would make the boat nearly uninhabitable for the next week. You really don’t want to be living aboard as I did during a project like this but I managed it by taping up a plastic sheet to seal the head from the main cabin and entered the forward cabin through the forward hatch when possible.
At this point I got rid of the old paint by grinding all surfaces of the hull in the area of the new tank using a 4.5” angle grinder and #36 grit discs. To protect myself from fiberglass dust during grinding, I wore a full Tyvek suit with hood, goggles, and cartridge respirator.
Instead of making complicated measurements and calculations, I made a rough guess as to the increased capacity of the new tank by simply adding 4-inches to the height of the original tank. Adding a small amount of height enormously increased the volume of the V-shaped tank. A rough estimation of your new tank capacity can be made by taking an average width, length and height of the V-shaped tank space and entering the figures in an online calculator for a rectangular tank. If you’re better at math than myself, you might be able to calculate the volume more accurately with exact measurements and some trigonometry. With pencil and tape measure, I marked the location of the tanks new top along the sides of the hull and the existing aft plywood locker bulkhead, which would now form the aft end of the tank. At the forward end of the tank I installed a 3/4-inch marine plywood bulkhead divider near the location of the original tank’s forward end. This created a useful separate storage locker between the tank and the chain locker.
Use of marine plywood is recommended instead of other plywoods that may not use waterproof glues, but the cost of marine ply has gone up a lot in recent years and nowadays it may not cost much more to use a composite foam sheet such as Corecell or Divinycell as I have done in recent years. Another composite sheet that could be used is Coosa but it is a higher cost and density than required. When using foam sheets I cut out the shape of each panel and add a layer of fiberglass cloth to each side. (If using plywood, you should also pre-fiberglass them.) Once cured I sand it and then fiberglass it in place with a layer of 3, 4 and 6” wide fiberglass tape. An added benefit of foam core is that there is no chance of a leak rotting the plywood over time.
Using cardboard, I made templates for the tank’s internal baffles and cut them out of 1/2-inch marine plywood (or 3/8” foam). The baffles were placed from bottom to top of the tank in an X-pattern (one running fore and aft and one athwartships) centered on the 6” access plate hole with notches cut into the top center of the X to provide clearance for your hand when cleaning the tank later. Holes in the baffle bottoms allow the water to flow between the four chambers. The baffles must be strong to restrict the potentially damaging force of water sloshing back and forth in a partially full tank. They also must divide the tank into small enough sections to reduce the force and noise of that sloshing water. Baffles add significant strength to the hull to increase its rigidity, which is what you want to prevent future leaks due to hull flexing. And there’s nothing worse than trying to sleep in a bunk above a half full water tank that lacks sufficient baffles when the boat is rolling in a swell.
After degreasing with acetone, I glassed in the baffles and aft vertical panel As I laid in the wood, glass and resin, I worked on the simple principle that if it looks strong it is strong.


To reduce the potential for epoxy to leech into the drinking water, when using West System epoxy I use a resin rich ratio of about 10% more resin than the manufacturers target ratio, as outlined in the link below. This ensures that the water-soluble amines in hardener cannot leech out.
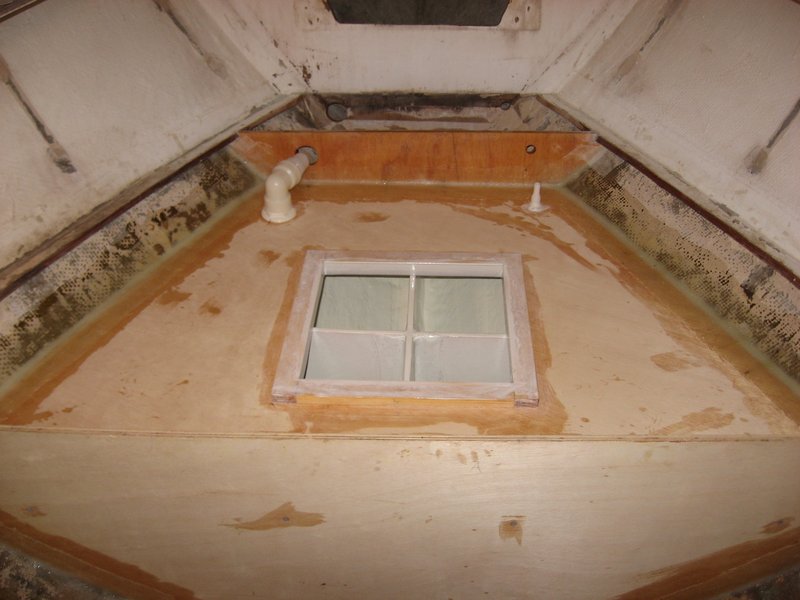
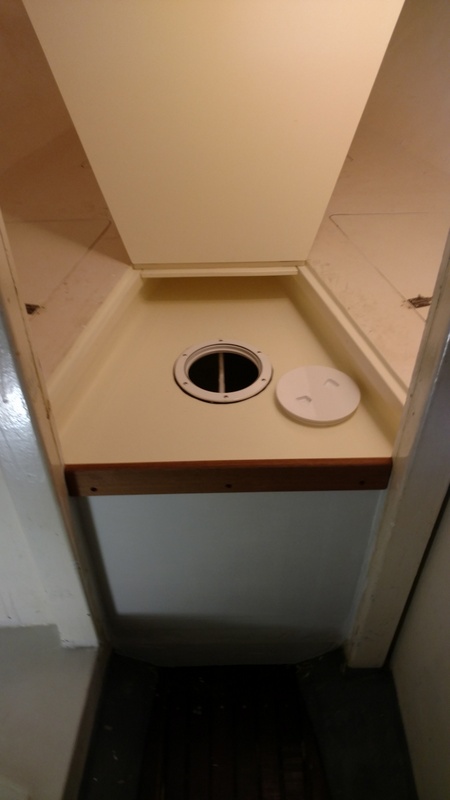
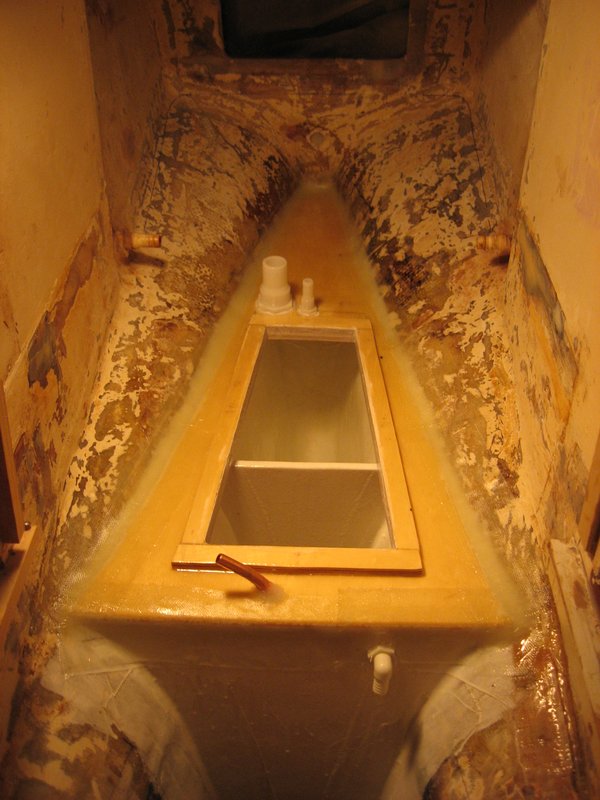
I then made another cardboard template for the top of the tank, cut it out of 1/2-inch plywood (or 1/2” Divinycell) and trimmed it to fit evenly along the hull and rest squarely on the top edges of the baffles. In this top piece I cut a 12-inch square access hole in the center where the baffles met which allowed clearance to reach a hand inside all four chambers for future cleaning. Then I removed the top and gave its edges and inside surface another coat of epoxy resin followed by two coats of nontoxic, drinking water safe epoxy paint. (Check the resource links below.) Later I added a 6” Beckson deck access plate for faster access that having to cut through the caulking holding down the board screwed over the 12-inch access hole. Beckson is the only brand I have found so far that does not leak. You may still want to have both the Beckson plate mounted into the larger opening cover board so that you can have both quick access and a larger opening for better access when needed.
I gave the inside of the tank a final sanding to remove sharp strands of fiberglass, and applied to all surfaces another coat of epoxy resin. After it cured and was sanded I applied three coats of nontoxic epoxy paint. At the bottom of the tank’s aft bulkhead, I installed a plastic thru-hull fitting suitable for a 1/2-inch water outlet hose. In the tank top I fitted another 1/2-inch thru-hull for a vent hose and a 1.5-inch thru-hull for the filler inlet. On later versions I found it easier to install the vent fitting up high in the forward vertical panel. Whenever possible I installed a clear hose sight gauge into the tanks aft panel that can be viewed through the adjoining locker. I then replaced the top, sealed the seam along its perimeter with thickened epoxy putty, and strengthened the seam from above with three overlapping layers of fiberglass cloth tape.
To finish the tank, I cut a piece of plywood for the inspection port cover, sealed it with epoxy resin and paint, and screwed it down on the tank top with a thin bead of West Marine’s Multi-caulk sealant.
With the tank finished, I moved on to replacing the top bunk panel I had earlier cut out. To add support, I glued cleats or strips of overhanging wood along the lower edges of the bunk cutout, filled the gaps with epoxy adhesive, and fastened it all from above with stainless steel screws. Before replacing the top I enlarged its access hatch to provide easy access for the shallow locker above the water tank. A 3/4-inch lip, or cleat, fixed around the bottom of the cutout, supports the hinged locker hatch. Barrel bolts keep it secured in case of a knockdown at sea. Later I added gaskets to make the locker lids at least partially watertight.
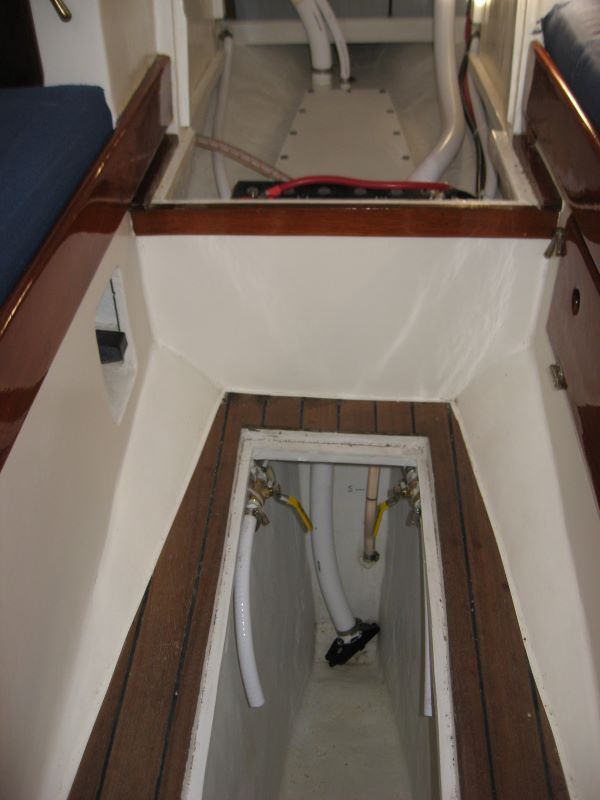
I ran the tank’s vent hose into the chain locker and secured it to the bulkhead near the deck. A screen secured with a zip tie on the end of the hose prevents insects entering the tank. Because there was no simple, attractive way to run the tank’s filler hose through the cabin to the deck, I installed the tank filler fitting flush on the top of the bunk directly above the tank. (There were some unexpected advantages to this that I will mention later.) If you use a Beckson plate you can fill from that and no other fill fitting is needed. From the tank outlet fitting I ran a food grade PVC hose, under the cabin sole to the galley foot pump.
Now that the integral tank occupied the lower v-berth area, I had to re-route the chain locker drain hose to pass over the top of the tank and then down to a shut-off valve in the bilge. To ensure the chain locker would drain, I planned for the top of the tank to be just below the level of the bottom of the chain locker. This is something that should be checked before doing your own installation unless your chain locker has a direct overboard drain. On later versions I usually fiberglass a false bottom into the V of the hull and pass the chain locker drain hose through that. To protect hoses from chafe, you can pass them through sleeves of short lengths of larger diameter hose where they pass through bulkheads. I find that chafe is not an issue though and generally just seal the hoses with caulking where they pass through watertight bulkheads.
Adding a Second Tank
Before using the tank, I scrubbed it out with detergents and then a solution of a gallon of water with a box of baking soda and rinsed it thoroughly. A household type carbon water filter was installed between the galley footpump and sink spout. The capacity of the new 43-gallon tank is nearly double that of the original tank. The extra 20 gallons I now carry adds about 200 pounds of weight to the forward end of the boat. To maintain balance required shifting other heavy supplies further aft.
Since the forward tank worked so well, I later added a second integral tank in the nearly inaccessible space of the aftermost bilge. Adding a 22-gallon tank in this otherwise unusable space helped counterbalance the weight of the forward tank.
Although Atom does sit noticeably lower in the water with this combined extra load of water, I don’t notice it much because the tanks are rarely full. But it’s good to know I can carry sufficient water when it’s needed for long passages or when visiting places where water is not easily available. To keep on an even keel trim, I first use the forward tank down to half full and then switch over to the aft tank until it is empty and then switch back to the forward tank. On a passage we use about one gallon per person each day for combined uses of drinking, cooking, and allowing one quart of water for a rinse after a saltwater shower in the cockpit. When water conservation is not a concern we each use an additional gallon per day, mainly for longer showers and other washing needs. For fetching water from shore I have five 3-gallon plastic cans that I keep stored in their own cockpit locker. I also have two 5-gallon cans that can fit into the side cockpit locker or in what used to be Atom’s engine compartment after I converted to an outboard well in the lazarette locker. This makes an adequate, ocean-crossing total capacity of nearly 100 gallons.
There is added safety in keeping water in two separate tanks in case one becomes contaminated or develops a leak. Each tank has its outlet hose going to a shut-off valve before joining the common inlet of the galley foot pump. On small cruising boats, I consider pressure pumps unacceptable because of their power usage, noise, unreliability and the way they encourage water wastage. Unless you enjoy washing your hands one at a time (something I never learned how to do well) I would not choose a galley hand pump except possibly as a saltwater pump for washing dishes.
The problem of having the forward tank’s water filler fitting below deck is that if you overfill the tank, the water ends up spilling on the forward bunk. This disadvantage is offset by the ability to refill the tank from rainwater collected on deck. On Atom I fit the two deck scuppers with valves that allow me to divert the deck drains to a hose below deck that use to fill a bucket and then filter it and transfer into the water tank. If the water filler were mounted on deck I would have to fill containers down below and then haul them on deck to pour them into the tank. There are times on passage when trying to refill water on the deck of a small boat is impossible due to the extreme motion and the possibility of having seawater enter the filler. Now I can safely refill the tank by siphoning water into it from a can resting on the bunk. Since the water tank filler fitting is located directly below the forward deck hatch, I can fill the tank from on deck with water jugs using a funnel connected to a 4-foot length of hose that I drop through the hatch into the open tank filler. At a marina slip I run the water hose directly into the open Beckson access plate. To avoid overfilling if not using the Beckson plate, I use the sight gauge to monitor the incoming water level.
photos
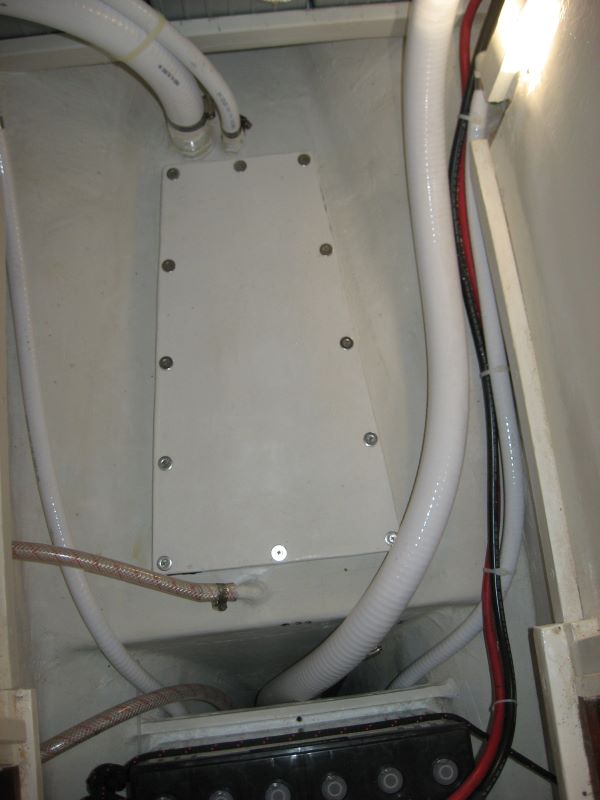
Forward 43-gallon water tank built into hull under the V-berth which was raised to increase storage. Top of tank is visible below open locker. Photo 2. The 22-gallon aft water tank was built into the otherwise useless space between of the aft bilge
Conclusions
When I built a similar sized tank into another boat in 2021 the materials including Divinycell sheets, fiberglass, epoxy, paint, and fittings cost about $450. Labor amounted to roughly 40 hours for the forward tank. While this is not a quick or easy job, it is within the ability of anyone experienced in general boat repair. Since my tanks worked out so well I’ve since constructed additional tanks on many other boats. Although all my tanks have not any problems, I suspect some lightly built modern boats may not be suited to integral tanks because of risk of tank bulkhead cracks due to hull flexing. In that case you could either build the tank even stronger with more fiberglass and dividers or a flexible tank may be the best way to go. Since flexible tanks are much easier and cheaper to install, some of my customers choose flexible tanks, though the only ones I found reliable were made by Vetus and Nauta.
You might think a watermaker would be a reasonable alternative to increased tank storage capacity. On a small, self-sufficient cruiser such as mine, a watermaker is out of the question because of their expense, energy use, unreliability, and maintenance hassles. When your watermaker does crap out in a place scarce of fresh water, like the Bahamas, you’ll be thankful for the extra storage capacity.
People have expressed a concern about the possibility of causing osmosis blisters by having water on both sides of the hull, as is the case next to the integral tank. My 55-year-old boat has had integral tanks for over 20 years now without any sign of blistering. After working for many years building and repairing fiberglass boats, it seems that a fiberglass boat will blister or not, chiefly depending on the quality of its lay-up and materials during construction and the coatings used to seal it thereafter. If the boat you are adding tanks to is showing signs of blistering, then of course that problem should be addressed first, or the adding of integral tanks may accelerate the problem. Modern barrier epoxies are, for practical purposes, impermeable to water. In short, if your boat is not blistering, an epoxy-lined tank should not start the problem.
Video of building an integral tank under the v-berth of an Alberg 30
Resources
Instructions for West System water tank construction:
http://epoxyworks.com/index.php/woodepoxy-composite-tank-guidelines/?hilite=tanks
FDA-certified epoxy water tank barrier coatings:
Devoe Bar-Rust 233H (This coating is what I use on tanks since 2017. It applies easier and covers better than other products I’ve used. Under certification of NSF/ANSI 61, most of these epoxy water tank coatings are listed as only been approved for 200 gal or larger tanks (because of the volume to surface area ratio calculation) but I read in the fine print that this coating is approved for down to 50 gal tanks and pipes if you allow 24 hours cure between coats. My feeling is that they are safe to use on these slightly smaller tanks as well.
http://www.sscoatings.net/brewcoat.htm I’ve used Brewcoat on water tanks before but it is only available in 2 gal kits for $220 (2020) and it sags easier and doesn’t seem to cover as well as Devoe Bar-Rust 233H. But it can be used if Bar-Rust is not available.