Building the Atom 6.5 Dinghy
A stitch and glue plywood and epoxy/fiberglass pram.
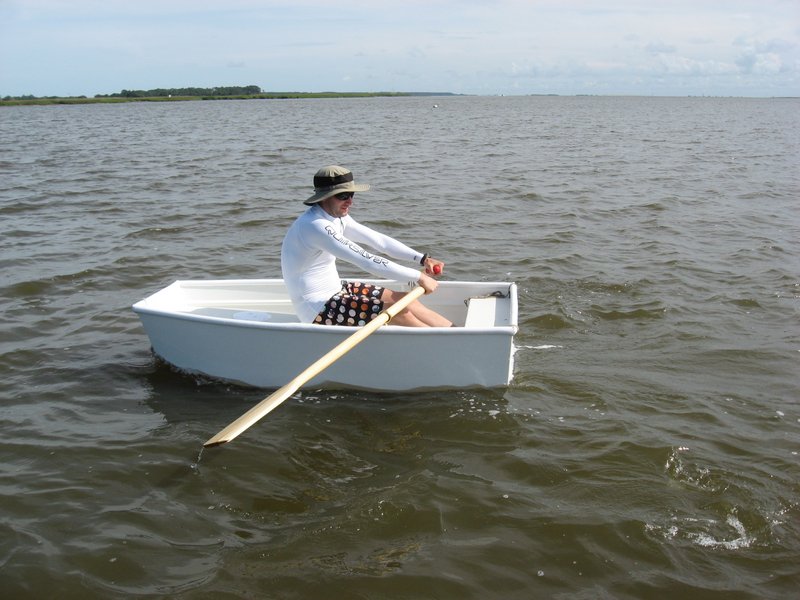
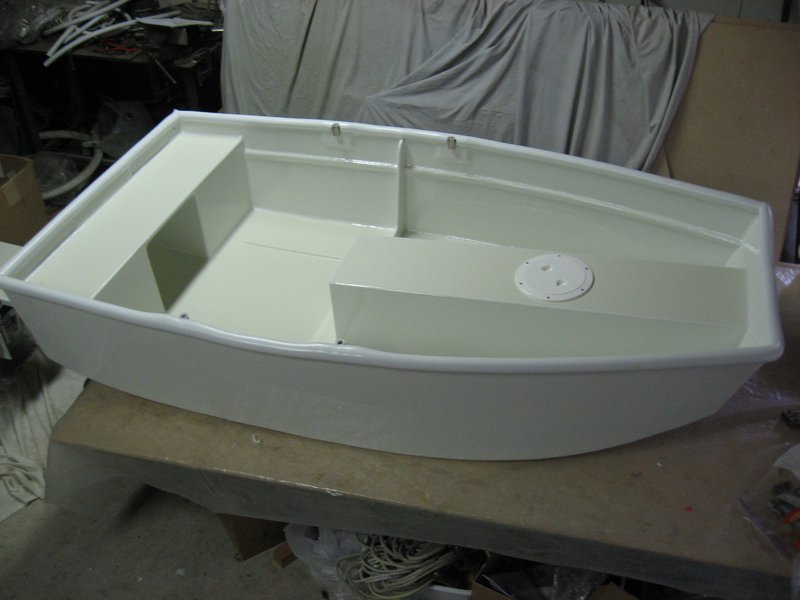
As with many other important items onboard, the choice of which type tender to carry on your sailboat is a compromise based on individual requirements and preferences, and the limitations of our pocketbooks. On small sailboats the lack of storage space on deck and below adds another restriction.
Many sailors choose an inflatable dinghy because inflatables are buoyant and lightweight with a large carrying capacity, stow fairly compact, and can be readily purchased at a marine store. On the negative side, good ones are expensive, vulnerable to damage from weather, chafe and vandals, and row so badly that, like it or not, you are almost forced to use an outboard motor. Inflatables are a preferred target for thieves and are not easily replaced in remote cruising areas. Another problem with inflatables is that their soft bow makes setting and retrieving a second anchor difficult when a motor is installed. Not thinking it wise to sail anywhere outside of a protected harbor while towing a dinghy, I prefer simply stowing my lightweight pram on the deck. Assembling, inflating and then disassembling and stowing an inflatable each time you get underway may be more of a hassle than you expected. It’s nice to have clear decks, but with all my other cruising gear, I just don’t have the locker space to stow an inflatable.
The folding Porta-Bote or two-part nesting dinghies are other options worth considering if you need the extra length and carrying capacity. But for simplicity and instant availability I prefer the minimalist approach of a self-built one-part pram. In the past I experimented with various sailing rigs on my dinghies with limited success. I found they did not perform well on a boat this small, the extra gear was troublesome to stow, and I didn’t often use them. For exploring sheltered waters at longer distances I find it easier to use my kayak instead of the dinghy. But the kayak is not an ideal replacement for a dinghy when occasionally you need to carry passengers and more supplies than a kayak can manage. Having both a kayak and a dinghy is ideal.
Over the years I have built several small dinghies for myself and others, using the “stitch and glue” technique of plywood covered with fiberglass. Due to the limited storage space on the deck of my 28’ Pearson Triton, and because of my preference for a lightweight dinghy that I can pick up by myself, I currently use a 6-foot version of the Atom 6.5 dinghy I designed in 2014. For most people the 6.5’ length is about the smallest dinghy that is practical for up to two people and the supplies they need to ferry ashore. Its overall dimensions are 6’6” long, 43” wide, and 15” high. She’s about 42” on the waterline empty with a draft of about 2”. She can easily carry 400lbs in moderately calm water and even more in flat calm water. This size dinghy will store on most sailboats either on the coach roof under the boom or on deck forward of the mast.
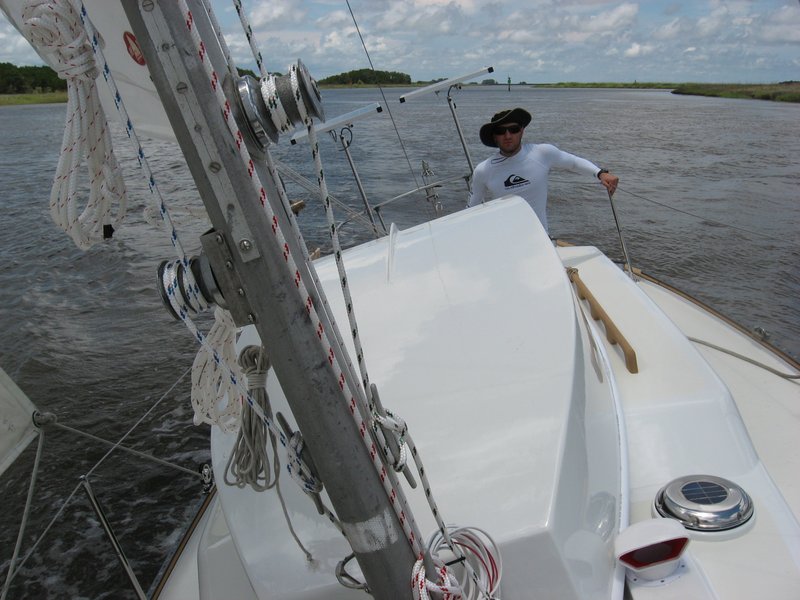
The Atom 6.5 stowed aft the mast on an Alberg 30.
Obviously an awkwardly large and heavier dinghy will carry more and row better, but that is the trade-off. I chose to design a flat bottom with the bottom curving up 6” forward and 2” aft, instead of the more traditional v-shaped bottom. This maximizes buoyancy and stability and minimizes draft. The flat bottom reduces the size of skeg needed because the leeward edge of the chine where the flat bottom meets the side of the hull seems to act like a skeg itself to reduce leeway in a crosswind.
So far I’ve built one Atom 6.5 version for a customer and tested it successfully. Many other people have purchased my patterns and built their own. Any dinghy is time consuming to build so for most people it makes sense to save the labor expense and build your own. The easiest way to do this is to have full-size paper patterns of each plywood panel. Alternatively, you could do as I have and come up with your own design, transfer it to cardboard panels and tape them together for a mock-up. Then you can modify the panel sizes as needed and trace them to plywood.
The Atom 6.5 is as strong and lightweight as I could build it while at the same time using relatively inexpensive materials. It weighs under 60 pounds, fitted out. My other requirements were that it be reasonably easy to build and repair, row fairly well, be capable of carrying up to a 3.5HP outboard motor and have positive buoyancy chambers. A larger dinghy with more tapered ends would certainly row better, but it would not stow easily and would be too heavy to lift on board without a tackle or drag up the beach beyond the high tide line. And having a small dinghy means yours is the least likely dinghy in the harbor to be stolen.
For economy, the first Atom 6.5 was built using 1/4″ hardwood plywood from Home Depot. The size was nominal and was actually closer to 3/16″ thickness. I sealed it well with multiple coats of epoxy resin. Even so, after a few years of use the cheap glue the factory used between the hardwood veneer and inner layers of plywood began to separate in a few places and I had to repair it. You should use marine ply for a longer lasting and marginally stronger result, if it’s in your budget, particularly if using a screwed on gunnel guard because it is hard to keep the many screws holes sealed from water. The snap-on PVC hose gunnel guard I use has no fasteners so does not have that problem. Otherwise, make sure that the plywood you use is manufactured with waterproof glue. Another option is to use a foam core panel such as Divinycell or Core-cell instead of plywood. Although considerably more expensive and more time-consuming to build, it can save some weight and will last forever.
The paper patterns were transferred to the plywood, panels cut out and stitched together and the joints glued and reinforced with strips of fiberglass cloth. The interior was sealed with epoxy resin and the exterior bottom covered with a single layer of epoxy saturated fiberglass cloth. Another advantage of having paper patterns is that if you ever need to replace it or build another similar one, you can reuse the patterns and build another one. Or you can modify the existing patterns to suit your own requirements. For example, you can build the Atom 6.0 by cutting 6” out of the patterns at the center, including removing 6” from the aft end of the forward seat. For a longer dinghy you could also lengthen the patterns by 6” in the center. But now you are getting so large that you may be better off to build an 8-foot nesting dinghy such as the Two-Paw.
Its other features include buoyancy chambers under each seat, ability to board dinghy from the water by lifting yourself in over the transom, a round gunnel (gunwale spelled as it’s pronounced) that allows you to snap on a sliced rubber hose for chafe protection, ability to haul an anchor over the bow and stern, a long center seat for shifting the rower’s position with two sets of oarlock positions, a cut-out in the aft seat for the rower’s feet, and a small skeg to reduce chafe when dragging over a hard surface. This skeg is optional since it is so small as to only slightly resist leeway when rowing in a cross-wind, but it also provides strength to the bottom in this area.
Some of the features of the Atom 6.5, such as buoyancy chambers and round gunnel, make this dinghy slightly more expensive and time consuming to build than some other dinghies, but I felt the extra effort was worth the better result. Building time should be about 40 hours, roughly half of which is for sanding and painting. With a nod to the simple and boxy boat designs of Fred Bolger, a friend has affectionately referred to the Atom 6.5 as the “Baldwin Box”, which I’ll take as a compliment!
Outlined below are step-by-step instructions for building the Atom 6.5 pram dinghy. You’re welcome to use these for free as an aid to building a similar dinghy of your own design. If needed, I can provide you with full-size paper patterns of all the plywood panels for $88 which includes shipping within the U.S. You can then transfer the paper patterns directly to your sheets of plywood. If ordering the patterns, please contact me with your mailing address and I will reply with payment options.
Video of building the Atom 6.5
Atom 6.5 Dinghy: Building Instructions
If you see errors or have questions, contact me and I’ll get back to you. Prices listed are as of July 2014.
Materials and costs:
1. Two 4×8’ sheets ¼” plywood. Best material is Okoume BS1088 marine ply. Use ¼” if you want more strength or 3/16” for lighter weight. Here’s a link to a New England supplier, but remember truck shipping is expensive if you don’t have a local source.
http://www.boulterplywood.com/MarinePlywood_4.htm
Although it may not last as long or be as strong, you can use locally available plywood like hardwood ply from a lumber supply – $30 each. If using non-marine plywood, pick pieces that aren’t warped and don’t show any voids along the edges. I stopped using this after finding the glue between the veneer and inner layers began to come apart in places after a couple years use.
Another option that costs more to build but will potentially make a lighter weight dinghy that will last forever and have better buoyancy if flooded is to use 3/8″ Divinycell PVC foam board or use Core-cell. The extra cost is not just for the foam boards but the extra fiberglass and resin used. Because of this I haven’t built a foam core version yet, but hope to in the future. The construction method will be similar to plywood but you need to strengthen it with an extra layer of fiberglass on all sides of each panel and under the oarlocks, replace the foam with wood blocks.
2. Seven pieces 11/16” x 3/8” x 8’ half round pine. Available from Lowes – $28. Or rip and router from four pieces 1×2”x8’ pine (actually .75”x 1.5”) from Home Depot – $12. You may need two pieces of 1×2 pine for holding out the sides during fiberglassing unless you have other scrap lumber available.
3. One piece 11/16” x 8’ pine quarter round form Home Depot – $2.
4. One 1.2 or 1.5 gallon kit of Epoxy laminating resin with dispensing pumps. From $145 at http://www.fiberglasssupply.com/Product_Catalog/Epoxy/epoxy.html
(fiberglass and epoxy materials priced below from fiberglasssupply.com)
5. One 5.5 oz box of colloidal silica such as West Systems 406 ($29) and one 4 oz box of 407 Low Density Filler ($20).
6. Three yards x 48” wide medium weight (about 6 oz) fiberglass cloth to cover the bottom and at least 6” up the sides – $15.
7. One 50-yard roll of 2” wide ($15) and one 50 yard roll of 4” wide ($26) 6 oz. fiberglass tape.
8. Optional – About 18′ of 1″ ID gray PVC flexible electrical conduit hose or your choice of gunnel guard for about $3.33/ft at Amazon but I had to buy a 50′ roll that was enough for two dinghies. You might find it at a local electrical supply. Previously I used 1″ Shields Series 148 Multi-Purpose Vinyl Hose but found it got black stains and hardened in the sun after a few years and I expect the PVC will do better. This is about $4/ft retail at West Marine so you might use Trident XHD Sanitation Hose from Defender.com at $3/ft or consider using old firehouse you might get free from a fire station. Perhaps it could be applied with contact cement to avoid all the screw holes. I prefer the PVC hose that snaps on so no holes and screws are needed.
9. One 6” deck plate inspection hatch from West Marine – $12.
10. Two sets (four pieces) Stainless-Steel Oarlock Edge Sockets, 1/2″ Outside Diameter Shank form West Marine $40.
11. One set of two Stainless-Steel Oarlocks, round, 2″ interior diameter from West Marine – $30.
12. Your choice of 6’ oars. The ones at West Marine are $40 each.
13. One package of 30 or more #8×3/4” and one package #8×1/2” flat head stainless sheet metal screws ($8).
14. One ¼” stainless steel U-bolt for towing eye. Available at Defender.com ($10) or local hardware.
15. One piece of teak or hardwood such as oak for skeg – ½”x2 ¼”x28”.
16. One roll of copper hobby wire from hardware store – $7.
17. Primer and paint of your choice. Two-part epoxy primer and polyurethane is best.
Other materials: About 12’ of 5/16” or 3/8” dinghy painter line and two pieces ¼” x 5′ nylon line for stern lines, optional vinyl-coated wire locking cable, small amount of sealant for inspection port oar locks and bow eye, four concrete blocks or water buckets as weight to hold shape of bottom and sides. Scrap lumber or old books to block up ends of dinghy bottom. Find a table to build on or use planks and sawhorses resting on concrete blocks.
Consumables: sandpaper, acetone, brushes, rollers, rags, mixing cups, dust mask, goggles and gloves, rounded sticks like tongue depressors for applying thickened epoxy fillets in corners, scrap cardboard.
Tools required:
1. Jig saw
2. Drill and bits
3. 4.5” angle grinder with #36 grit sanding pads or similar tool
4. Oscillating cutting tool such as the Multi-Max for splitting vinyl hose for gunnel guard
5. Belt sander with #50 grit belt
6. Orbital sander with #80, 120, 220, and 320 sandpaper
7. Screwdriver, pliers, wide and narrow putty knives.
8. At least two 3” clamps.
9. If making your own half round lumber you’ll need a table saw and router with 3/8” round-over bit.
Paper patterns are labeled with the following code:
A-1 – Bottom
A-2, A-3 – Vertical forward ends of aft seats
A-4 – Top of aft seat (gets glued together with B-5)
A-5, A-6 – Vertical inside ends of aft seats
A-7 – Vertical hull stiffener for inside center transom
A-8 – Bow
A-9 – Vertical aft end of forward seat
A10 – Transom
B-1 – Top of forward seat (gets glued to B-8)
B-2 – Bow stiffener
B-3, B-4 – Hull sides
B-5 – Top of aft seat (gets glued to A-4)
B-6, B-7 – Vertical sides of forward seat
B-8 – Top of forward seat (gets glued to B-1
B-9, B-10 – Knees for bottom to hull sides support
B-11 to B-14 – Oarlocks stiffeners
B-15 to B-18 – Transom corner stiffeners
Assembly instructions:
To make it easy on your back and to have the bottom edges accessible for stitching the sides onto, it’s necessary to build the dinghy on a raised surface. A sturdy table or even two sawhorses with a couple of 2×10 planks over them will work. At the least, place planks directly on a couple concrete blocks on the floor. The following instructions may seem complicated but will become clear when you read it while actually doing the assembly and referring to photos and video.
1. Unroll the two paper pattern sheets and then re-roll them backwards to remove some of the paper’s bend. Cut out the 26 individual patterns with scissors. Then lay them out according to the numbered assembly sketches #1 and #2 below, and trace the lines with pencil onto your two 4×8’ sheets of plywood. (If building the 6.0 version, cut 6” out from the center of the bottom and side panel patterns and cut 6” off the aft end of the forward seat sides and top. Gunnel reinforcements and hull stringers will be correspondingly shorter as well and you can adjust these to fit later. You can also add 6 inches to the center to make a 7′ dinghy)
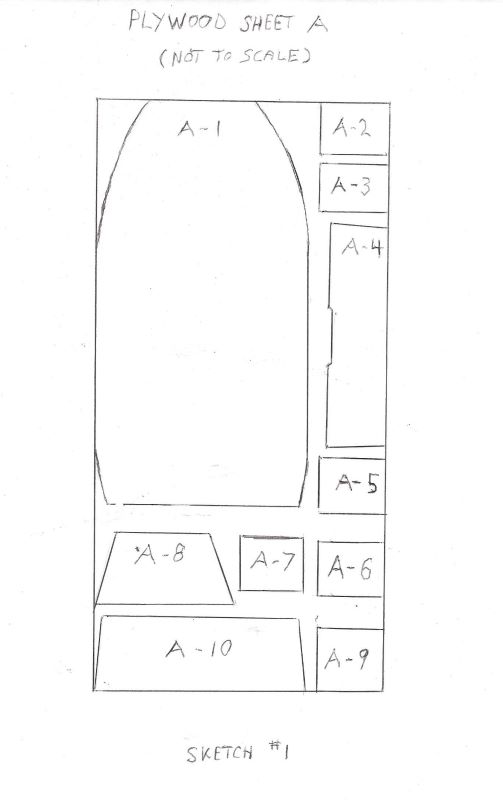
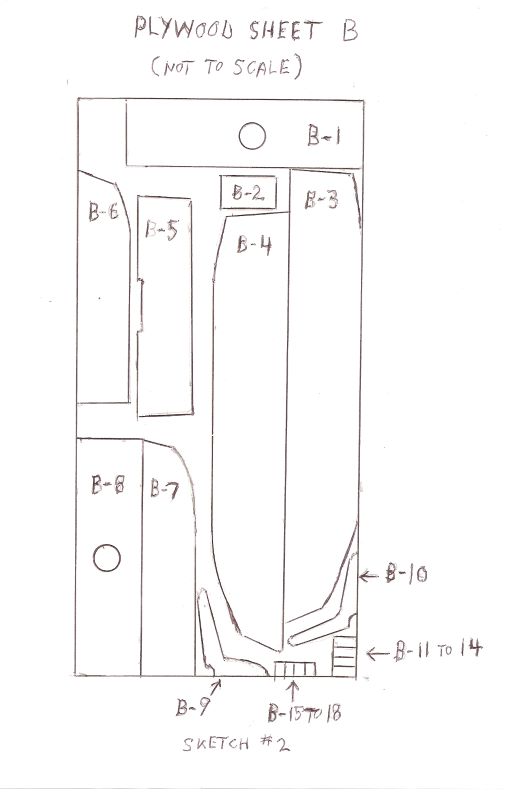
These sketches show how the patterns are laid out on two 4″ x 8″ sheets. of paper
2. To ensure the best fit of the plywood panels, first cut out with jig saw only the bottom (A-1), sides (B-3, B-4), bow (A-8) and transom (A-10) and belt sand the edges smooth. Once these are stitched and glassed together you can check if the paper patterns for the seats accurately match the curve of the hull shape. If needed, modify the patterns before cutting the plywood.
3. In the online instructional video a bottom-shaping form was used to provide the curves in the bottom on the first prototype dinghy. You don’t need a form. Place bottom panel on table with two 5-gal buckets of water or concrete blocks near center. Bend the forward end up 6” and the aft end up 2 ¼” and support with scrap lumber or old books covered in plastic. Drill 3/32” matching holes about ¼” from the edges near the corners of the panels and roughly 6” apart along the lengths of the panels where they will join.
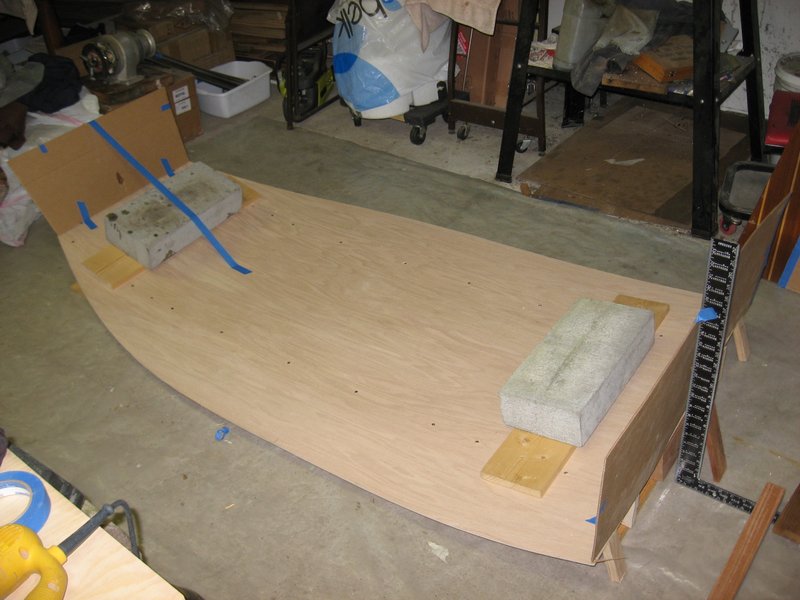
This shows the prototype being built on a form. You won’t use this form and will move your
weights towards the center to curve the bottom.
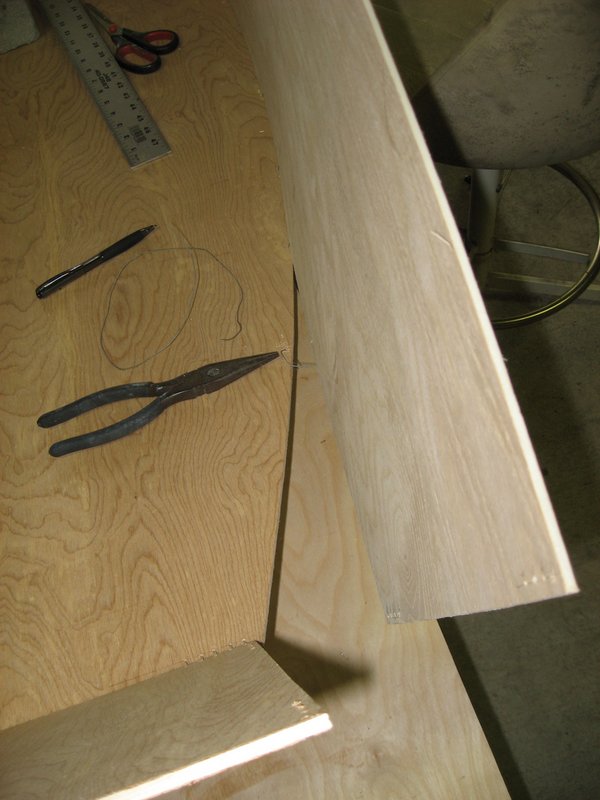
Preparing to wire tie first panels.
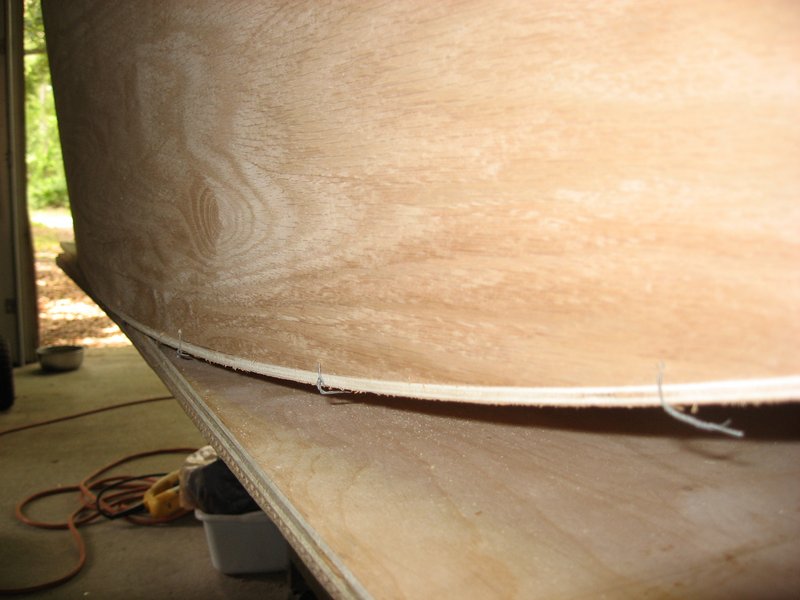
Sides wired to bottom.
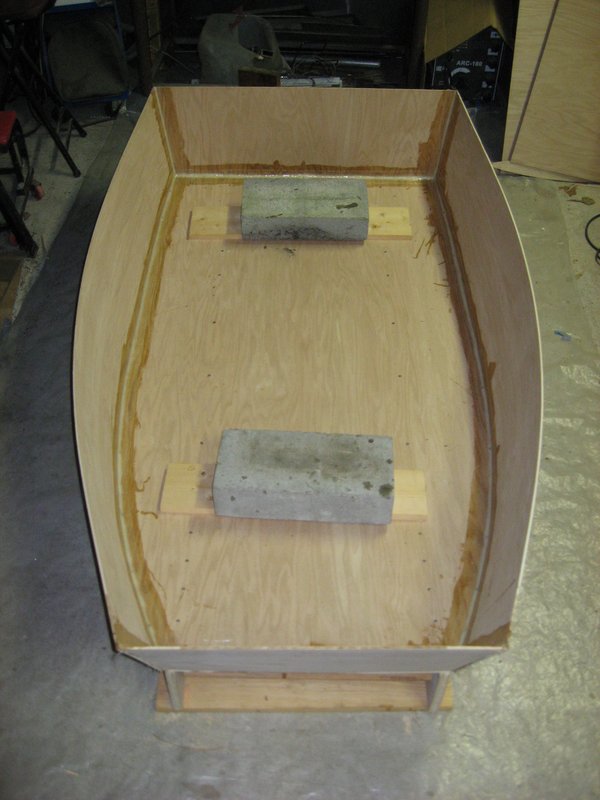
Fiberglass tape applied to inside seams.
4. Use buckets of water or blocks to support the transom and bow panels during stitching. The bow and transom sit on the top edge of the bottom panel and their outside edges fit ¼” inside the bottom panel corners to allow space for the side panels to attach. Wire the bottoms in place with the bow top angled out 3 ¼” and stern top angled out ¾”. Stick 3″ lengths of wire through the holes from the inside and twist tight from the outside with pliers. Wire the two side panels to the bow, bottom, and transom. The side panels sit on top the edge of the bottom and outside the bow and transom panels.
It seems to work better wiring the panels in place beginning at upper transom corners with blocks supporting the plywood, then work your way along the bottom toward the bow. Slide the dinghy to overhang the edge of the table so you can attach the wire ties. It will take some bending pressure on the wood and pulling with pliers to get the panels stitched up tight. If you see gaps they can be filled later with thickened epoxy or you can drill more holes and apply more wire stitches. The exposed wire ends on the outside will be cut away later when rounding the outside joints with your angle grinder. Use scrap wood, such as 1×2, for a temporary cross brace. Cut it to 40 ¾” long and insert it near the top edges of the sides about 38” forward of the transom to hold the sides out to the correct angles. Add a shorter piece midway between it and the bow and another midway to the transom to provide a uniform curve to the gunnel. Tape or screw the boards in place. If the gunnel top corners are uneven in height, you can correct that later. Temporarily clamp a 1×2 to the outside of bow and transom if the panels have bent during assembly.
5. Presoak the inside seams with epoxy resin. Before that hardens, apply a 1/4″ wide fillet bead to the inside joints using epoxy thickened to consistency of peanut butter with West System 406 or similar. I use a ziplock freezer bag with the corner cut out to squeeze out the epoxy evenly. A tongue depressor type tool will smooth it out. Before the fillets harden, apply 2” wide strips of fiberglass cloth to inside seams and wet them out with a 2” chip brush. Use a jar partly filled with acetone to soak the epoxy brush in to prevent it hardening when you want to use it again within a few hours. Let epoxy cure overnight.
6. To ensure the vertical seat panels will fit the curve of the bottom, transfer the seat patterns to cardboard and tape them in place, filling gaps with tape or trimming with scissors as needed. If the cardboard required some modification to fit, take these pieces and retrace the new patterns onto the plywood where the paper patterns were traced, but use darker ink so the new lines will show up over the old pencil lines. Also check that the hull side ribs, or knees (B-9, B-10) fit by making cardboard patterns. These pieces line up with the aft end of the forward seat. Then cut out all the remaining plywood panels except the four seat tops.
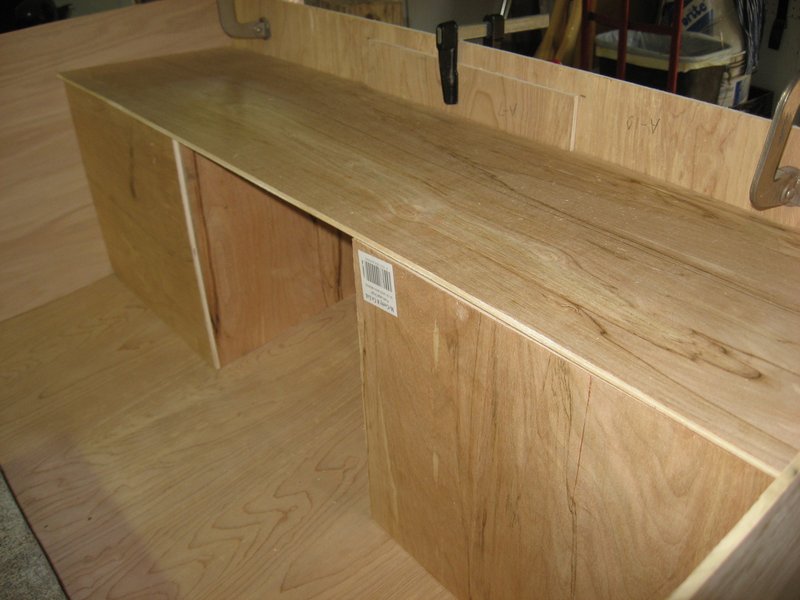
Dry-fitting the aft seat panels.
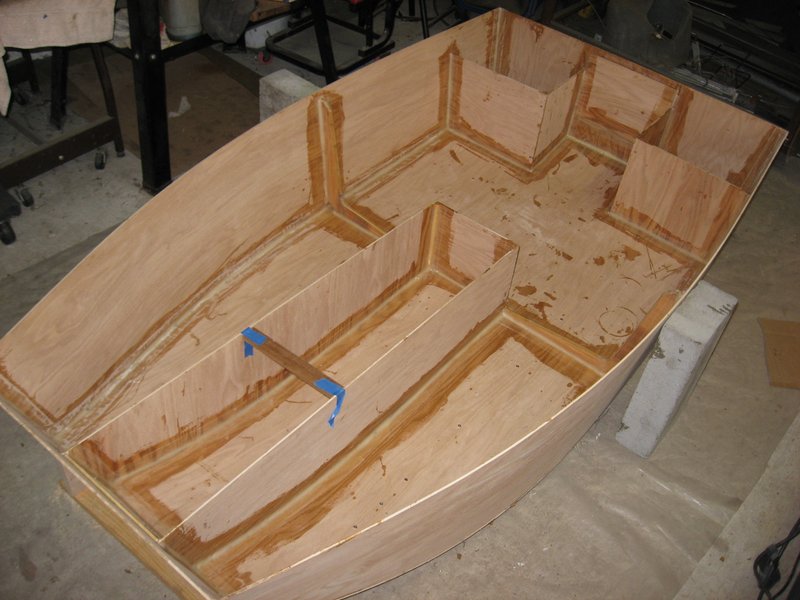
Vertical seat panels fiberglassed.
7. Once epoxy has cured, remove clamps from bow and transom. Use a grinder and belt sander as needed to level and fair the gunnel edges. Then replace the clamps if transom and bow panels are not straight.
8. Fit the three vertical forward seat panels by screwing the aft ends together with two ½” x 8 ½” quarter round pieces of pine in the aft corners. The aft end panel (A-9) goes inside the sides so that the seat width will fit the top panel that goes on later. After a dry-fit, remove the screws and reassemble with epoxy. The screws will come out later so don’t try to make them sit flush. Set the seat sides in place and insert the vertical bow stiffener panel (B-2) on the centerline of the bow and trim it if needed to fit level with the seat sides. Screw and epoxy this piece in place and then set the seat assembly in so that the forward ends of the sides go outside of B-2. Insert some #8×1/2” screws at an angle into the seat sides at the forward and aft ends to hold it in place. To save the need to remove the screws later and touchup the fiberglass over them, it’s best to drive them in far enough that the epoxy fillet and fiberglass will cover the heads. Any bits if screw sticking out the bottom can be cut off later with your angle grinder. Apply 406 and 2” fiberglass to all inside edges of seat and coat all bare wood inside seat with epoxy resin.
9. Repeat same procedure for aft seat using quarter round supports for inside corners and fitting forward pieces (A-2, A-3) outside of pieces A-5 and A-6. Attach top edge of center transom stiffener (A-7) ¾” below gunnel top. The vertical inside ends of the seat will go outside of A-7. Add two pieces of quarter round lumber to transom and two pieces to the sides of the hull to support seat top in these areas. To find where they should be located, place the seat top in position and draw a pencil line along the transom and sides and then screw the quarter rounds ½” or 3/8” (thickness of seat top) below that line. Drill some 3/16” holes in the transom and sides so you can screw in the quarter rounds from outside. Add a similar quarter round to the bow at the forward end of forward seat. Once the epoxy cures, remove these and other temporary screws and fill the screw holes with thickened epoxy.
10. Check that the horizontal seat top patterns fit the vertical seat panels. If needed, cut paint mixing sticks and temporarily tape in place as spreaders. Then bond the insides of the doubled ¼” seat tops (A-4 to B-5 and B-1 to B-8) together with epoxy resin by laying them out on the floor on a sheet of plastic. Secure the two layers with a couple screws near the ends to prevent them from sliding out of alignment and cover with plastic and weights until cured. You can add a small amount of thickener to the resin to ensure a good bond.
11. After the doubled seat panels have cured, remove the screws, check their fit and trim as needed. The aft seat should be level fore and aft or angled down slightly at its forward end so water does not puddle on the aft end of the seat. Trim vertical seat supports with your grinder as needed to get this angle correct. Belt sand the edges of the seat tops to make a good fit, soak all the inside wood with epoxy resin and sit top down on a bead of thickened epoxy. Screw the aft seat down to the quarter round supports where needed to keep it flat or place weights on the seat. Do same for front seat. Add thickened epoxy fillet to top seam of aft seat and cover with 2” fiberglass tape. If you plan to use a motor you should add several more layers of fiberglass between seat top and transom in the area where the motor clamps.
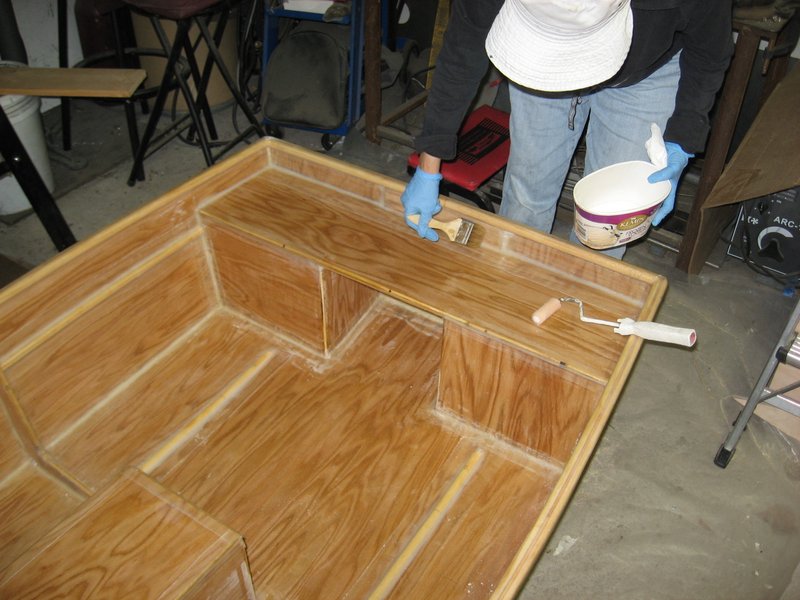
Applying the fiberglass tape and resin.
12. Round the inside edges of knees (B-9, B-10) so that fiberglass cloth will lay over the edges and install about 32” forward of the transom so that they line up with the aft end of the forward seat. You could use ½” plywood for these knees if you want extra strength or apply double layers of fiberglass when using the ¼” knees. Epoxy fillet and fiberglass the knees in place with 4” tape. Lay the glass tape along the forward side, then along aft side, then tie them together with one over the top.
13. You’ll need about 57’ of 3/8”x11/16” pine half round (or make your own from 1×2 pine) for gunnel and hull supports. Cut and dry-fit the half rounds to the inside top edge of gunnel with #8×1/2” screws as needed to hold them to the curve of the hull. If the half rounds are stiff and tend to pull the gunnel out of shape, cut slices partway through the backs so they bend easier. Put the screws in from the outside and countersink the hull sides so the screw heads are flush. These will stay in place after gluing because they will be under the outer pieces of ½ round, so don’t put any screws in the areas of the oar locks or they may interfere with the oar lock mounting screws. Dry-fit the outside half rounds by screwing them on from outside with ¾” screws. Remove the pieces, apply thickened epoxy and reassemble. Alternatively, you can install both sides of the half rounds together and not use the short screws to hold the inside first, if you have the extra clamps or extra hands to assist.
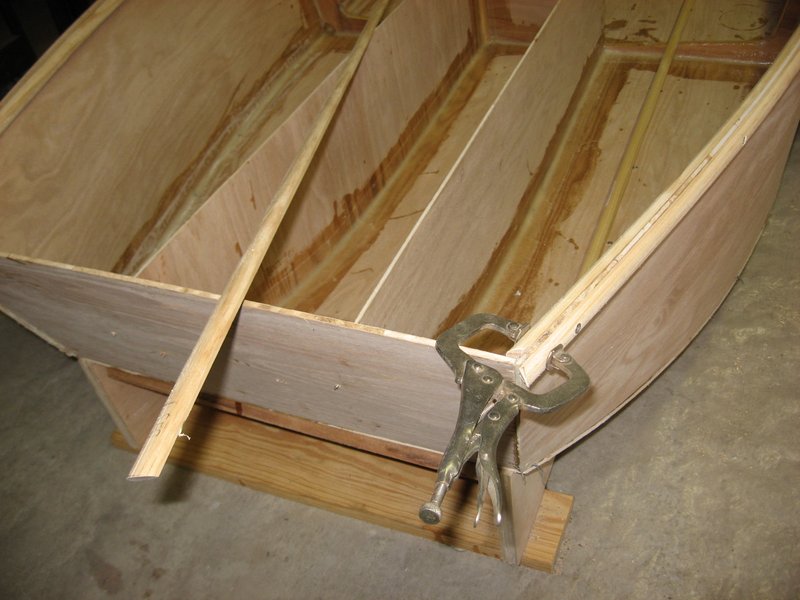
Installing the gunnels.
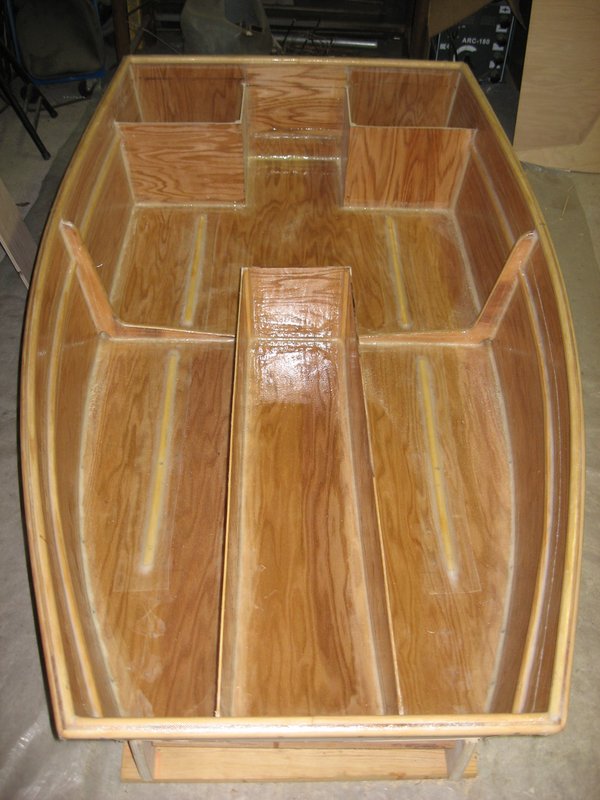
Gunnels installed.
14. Remove exposed screws from gunnel, sand and shape smooth, fill holes with thickened epoxy and wrap 4” fiberglass tape around gunnel.
15. Cut the proper lengths of half round for hull longitudinal stiffeners and bottom stiffeners as listed in sketch #3. The upper pieces on the hull sides are placed 5” below the gunnel top. Taper the ends of the four bottom pieces so the fiberglass will conform to them over the plywood without air pockets. Dry-fit with screws as you did the gunnel guards then remove and glue them down. After cure, remove screws, sand smooth, fill holes, apply small epoxy fillets and cover with 4” fiberglass tape. Again, if you notice the half rounds deforming the hull, cut notches in their backs to make bending easier.
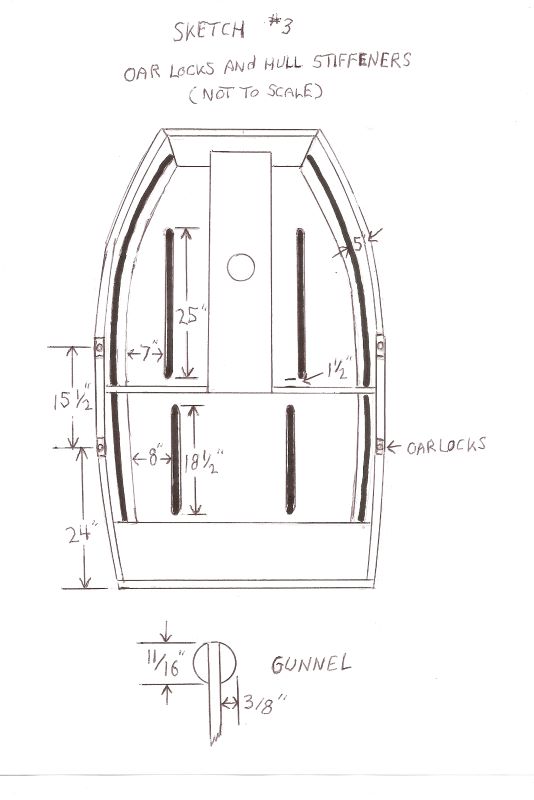
16. Bed the four aft transom corner stiffeners (B-15 thru 18) in thickened epoxy and press in place between the gunnel and seat top, and cover with 4” fiberglass tape. Attach oarlock stiffener pieces (B-11 thru 14) according to sketch #3 same as you did for the transom corner stiffeners.
17. Turn dinghy upside down, remove any visible screws, fill holes, grind and sand corners round, and apply 4” fiberglass tape to joints.
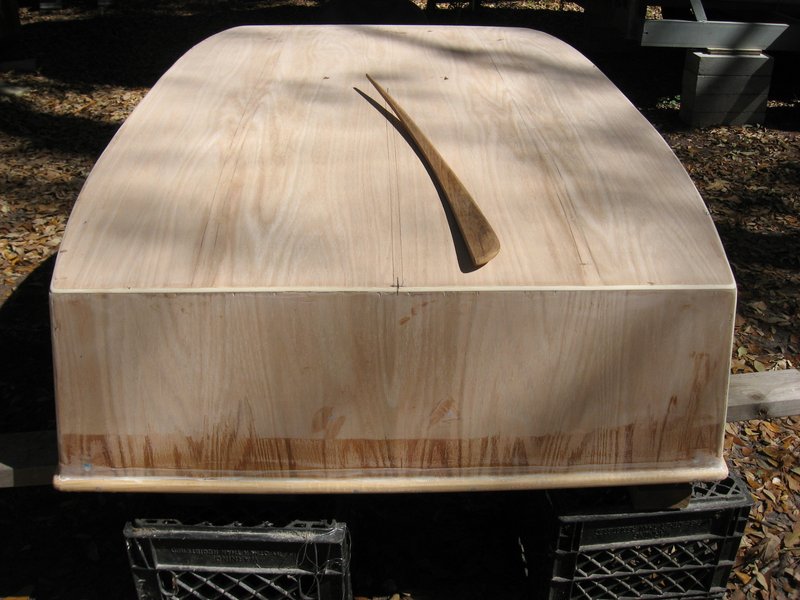
Fitting the hardwood skeg.
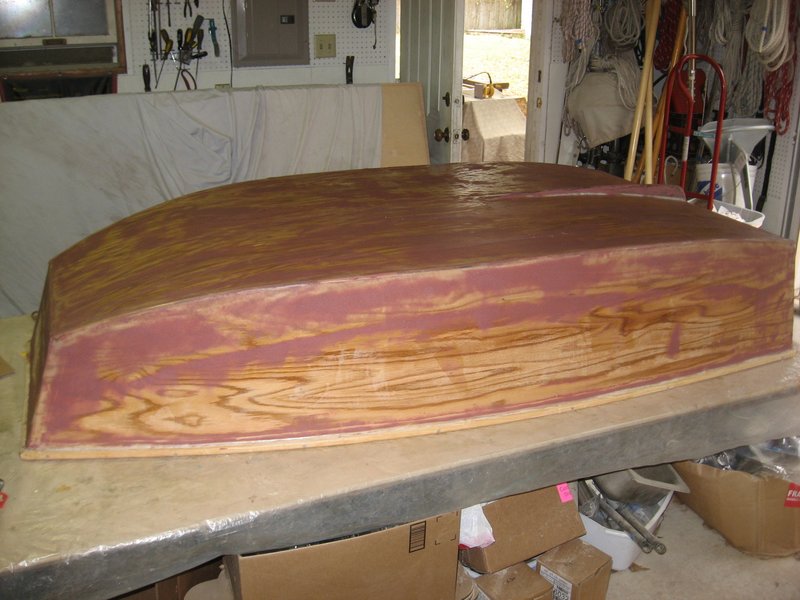
Bottom fiberglassed and fairing compound applied.
18. Once cured, sand edges of tape smooth and then apply fiberglass cloth to entire bottom, wetting it out with ¼” nap rollers. Lap the fiberglass at least 5” around the edges and up the sides. Use any width roll of fiberglass you prefer but if you use a 48-50” wide roll you can put it on in one piece and avoid lap joints. Narrower cloth may be easier to work with, so that’s your choice.
19. For your transom mooring or hoisting bridle lines, drill ½” holes in each corner of transom centered where stiffener pieces are located. Then fill the holes with thickened epoxy and redrill 3/8” after cure. This epoxy filling and redrilling ensures water does not get into the plywood later.
20. Drill the ¼” holes for the bow eye oversize to 3/8”, fill with epoxy and redrill later to install bow eye, similar as you did the stern line holes. Place the holes about midway between hull and seat top.
21. Use the paper skeg pattern (B-19) transferred to plywood to check the fit to curvature of bottom. Modify as needed, cut out of hardwood and attach skeg with epoxy fillets and fiberglass tape. Let cure.
22. Sand entire dinghy inside and out with #80 grit paper on a random orbital sander, being careful not to sand away fiberglass on the corners. (No need to sand and paint inside seat.) Apply an epoxy fairing compound such as West System 407 to all rough surfaces and uneven fiberglass edges. Let harden and sand smooth with #80 paper again. If you go through to bare wood anywhere, touch-up spots with epoxy resin. Or add a second coat of epoxy throughout for extra protection at the cost of more money and weight. Final sand with #120 grit.
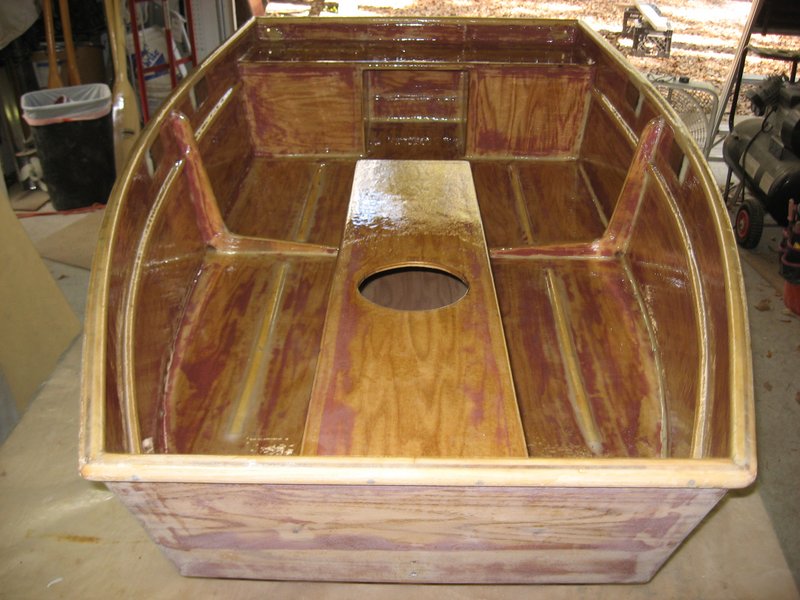
Final coat of epoxy resin being applied.
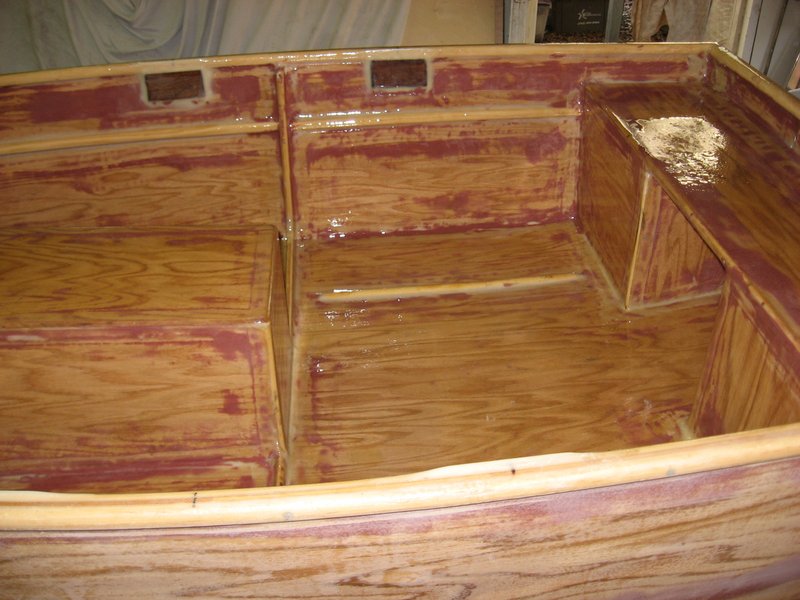
Oarlock stiffeners in place.
23. Apply two-part epoxy primer such as Interlux Epoxy Primekote to all surfaces. Sand as directed, mask off areas you want for non-skid (all of inside bottom and seat tops) and apply a two-part paint such as Interlux Perfection as directed. After this trim is painted you can use the same paint with Intergrip Nonskid Additive. You may want to use a light-colored paint to keep the dinghy less hot in the sun. You can add a small amount of darker paint to the light when doing the nonskid for a two-tone effect.
24. After the paint is complete, install the inspection port, bow eye and oarlocks as shown in sketch #3. Use a non-silicone caulking sealant such as 3m 4200 or butyl rubber or polysulfide to seal the fasteners to help prevent rot later.

Finished with hardware installed.
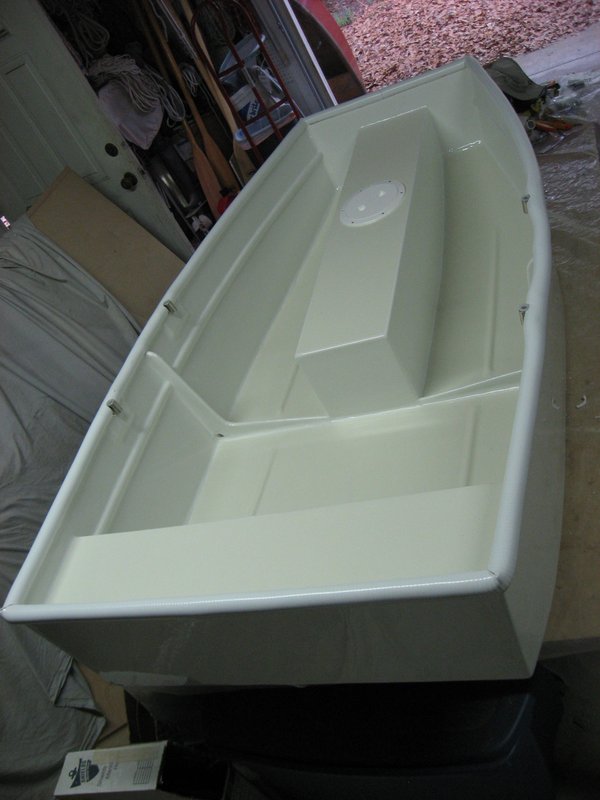
Vinyl hose rub rail attached. I later found the vinyl hose discolors and switched to gray 1″ PVC flexible electrical conduit hose.
25. If using the 1” PVC hose for gunnel guard, cut it lengthwise using an oscillating tool with wood cutting blade and snap it over the gunnel. You will need to notch the inside corners of the hose as you reach each corner and the oar locks.
Project complete. Head for the water!
